
This page details the steps I took constructing the Starfury MK1 from the Babylon 5 TV. series. I will detail what is involved in the construction over the next few months. The model is made by Revel Monogram and I think it's the first I've made of theirs. I have got a Cylon Raider ship from Batlestar Galactica and Voyager from Star Trek made by the same people, so this project will give me an idea of what to expect. So far I have fitted the two half's and the back of the fuselage together and attached it to the lower wing, then fitted and filled the inner wings then fitted and filled the upper inner wings.
 You can see some of the filler on the wing at the bottom of this picture. Next I attached the other part of the wing which completes the thruster pods on the end of each wing. some more filling is required just to tidy these up but not too much because all the thrusters have to be attached yet. I have also started to detail the pilot and cockpit because I plan to prime and paint the model virtually completed so I have also started masking off the cockpit windows which takes ages because it is so tiny. There are four different sets of decals provided with the kit so I have to decide which one to choose pretty soon.
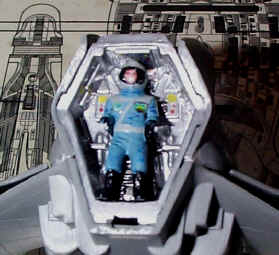
In this picture you can see detail on the pilot. This model has some of the smallest decals I have ever seen, including the badges on the pilot's arms and lapels and the actual helmet face. I am not too fanatical on getting details 100 percent correct although I have every respect for modellers who spend hours watching clips and searching out reference material. I am just looking for realism, I'll make up my own history and story for each model so that is why the colours might not be the same as those on TV. Once I have finished with the cockpit I can attach the two halves together and fit the cockpit canopy so I have got plenty to do.
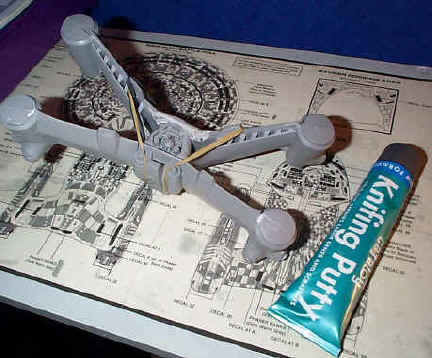
 Now I have attached the two half's together. I have got some new filler from Halford's car accessories called Knifing Putty. It seems OK but time will tell as I am now waiting for some to dry where the two parts meet. I think this will give a smother finish than the Humbrol model filler I had been using. The main problem with this was this was it had gone off slightly and it was difficult to get any out of the tube. I suppose this is why a lot of modellers use car filler with a separate hardener.
 Now I have finished detailing the cockpit I have attached the glass canopy and filled around the joints. I masked the windows by covering the area with tape and then trimming it with a scalpel. I used to cut little bits of tape and stick them on, but this took hours. The new method saves so much time and effort I can't believe I did not think of it before. I have been tidying up the rest of the parts and I will attach them over the next couple of days. I have now bought some spray paint for the job. I have picked a metallic black spray because I have decided to go for the Black Omega look (as shown on the back of the box).
Nearly ready for the first coat of paint, I have filled the wing joints and rubbed them down an attached the cannons and thrusters. I drilled out the ends of the cannons to give them a more realistic look. Next I have to attach the vanes to the thruster pods then it should be ready for a coat of primer. I have also took the shine of the body with a quick sanding all over, just to give the paint a key to grip to. I have also assembled the base so I can spray that at the same time.
I have just sprayed the completed model with grey car primer. It took a couple of goes to get it all covered and once everything was dry I was able to sand down any thing that stood out and give it one more complete covering. Next will come the Black Pearlescent top coat once everything is thoroughly dry.

We are now coming to the final stages now. I have sprayed the Starfury and stand with the Black Pearlescent car paint and it gives a good metallic finish. I now have to apply the decals and weather the ship now using lighter colours as a pose to the normal blacks and rusts to simulate leakage and scorching. There is a little touching up to be done around the cockpit windows and the whole thing will then need a coat of lacquer to bring all the surfaces together.
