Friday, April 10, 2009

Independence Day - Captured Alien Attacker

This is the Captured Alien Attacker from the 20th Century Fox film, Independence Day. I built this quite a long time ago now so some of the details are a little sketchy.
The model is manufactured by Lindberg. I think it is the only one of there's I have made. The assembly of the main components was very straight forward.


Painting this model was interesting, I used Gun-Metal paint for the first time. After applying the paint and letting it dry you can polish away the top layer to recreate a metal effect. The engine cooler fins are painted with metallic copper and brass coloured paints and I used chrome silver to pick out the panel joints.


There are some great surface details on this model which really add to the overall quality of the whole thing. With only about 14 parts including the base, this has to be one of the simplest models I have ever made. Everything fitted together well and required little or no filling what so ever.
I enjoyed the special effects in the movie far better than the gung-ho, jingoistic plot and this is a great reminder of a simple, but excellent space ship design.


I enjoyed the special effects in the movie far better than the gung-ho, jingoistic plot and this is a great reminder of a simple, but excellent space ship design.


Thursday, March 19, 2009

Star Wars - Speeder Bike And Scout Trooper


"The light repulsorlift Imperial speeder bike carries one or two riders at high velocities for reconnaissance and antipersonnel missions. An unusual turbine repolsorlift makes the bike stable even in extreme manoeuvres. Forward-reaching repulsor fields help thread it through obstacles like trees, but their guidance must be used carefully because they are not strong enough to deflect the bike away from obstacles on their own."
Extract from Star Wars, The Visual Dictionary


I think this to be the best model I have made so far. I spent a considerable amount of time and effort into getting it right and I am really pleased with the results. It is two projects in one because you have to build the Speeder Bike and the Scout Troop which both require different skills.

Firstly I will start with the Speeder Bike. The most important thing in getting this to look so good was excellent reference material. I read somewhere that the colours recommended with the kit were incorrect so I got the Star Wars Archives book which has got some great pictures in it. This set me on the right track. The other stroke of luck was my recent discovery of enamel Gun Metal paint which you apply and when it is dry, rub with a soft rag to reveal a polished metallic effect. This made the frame of the bike look really good.


I painted the main body of the bike grey first and then mixed the brown myself using enamel paints.


I always hand paint using enamels which makes thing difficult at times, there are far easier mediums but I like the results. There was a little filling on this model, in particular, where the handle bars met the shell and the cables and levers are very fragile. I mixed a lighter brown for the saddle bag and then made the whole thing look used by smudging and streaking different colours here and there. One thing I did before I painted the bike was scratch the shell with a file to simulate damage on the bodywork. This paid off by adding an extra bit of realism.


Next came the Scout Trooper, he was the first person I had ever made. Basically the arms and head attach to body and then he needed painting. However there was a lot of filling and some modelling to be done first.


I found the arms did not fit very well so I got some modelling clay and improvised shoulder joints which moved the arm away from the body a little bit and meant I had to sculpt the shoulder pads where they met the body. The head was similar, I added a bit of neck and sculptor that accordingly.


I scratch built a breathing piece for the front of the helmet and painted it silver, I also made a lid for the top of his back pack. I sprayed the scout matt black and then painted the armour gloss white.


 I picked out the details with matt black then dirtied the whole thing down. I think he turned out pretty good for my first person.


DLP Guitars - Handmade in Birmingham, England

Star Trek - Klingon Bird Of Prey


This is my very small Klingon Bird of Prey model. It only measures 85mm by 120mm but it is very detailed. I spent considerable time painting this model and I experimented with new techniques to achieve the desired result. As you can see from the picture above, the ship looks very good close up thanks to the extra attention to detail.

I employed a dry brushing technique for the first time. After applying a base coat, I used a cocktail stick to dab a small spot of paint and then work it in with a dry brush. It took quite a while to do the whole model but it all seemed worth while.


For the picture at the top of the page I used Adobe PhotoShop to cut out the picture of the ship and then dropped a picture of a moon behind it. I added some lens effects and adjusted the colour and contrast for a little more realism. I think it almost looks like a still from one of the movies, now all I need to is create the other 20,000 frames and I will have my own movie !


Wednesday, March 18, 2009

Babylon 5 - Starfury MK1 - Finished Model (Part 2)


This is the finished model. I weathered it by roughly mixing black and white acrylic paint and dabbing it along the panel lines then dragging the paint with a dry rag towards the rear of the model as though grime and lubricant had run around the panels. I had to use greys and whites to stand out against the black metallic paint job.

The decals were not so bad although the omega symbol was so big it was difficult to get flat with no air bubbles. There are some small, square white panel decals which seemed to stand out too much so I put a blob of paint on top of them and smeared it to disguise them a little. This makes them look like major access panels that have attracted an awful lot of grime. There is one thing I do not understand, as far as I know these ships are constructed for space flight so how do they get so dirty? If you look at one on the TV. show you can see all the grime on there ships as well.


I printed a small Babylon 5 logo onto a sticky label and attached it to the front of the stand, this just finishes of an otherwise boring base. I gave the entire model a coat of very weak black wash which only stuck to the areas I had weathered, this just did enough to bring the effect down a shade and gives a more subtle overall effect.


CONCLUSIONS
This was a good project that I enjoyed even though it seemed to take an eternity to complete, there was a little bit of filling but for the best part most of the parts fitted pretty well. I have read a couple of other reviews for the StarFury and every one seems to have two main gripes.

1-  The overall size of the model
2 - Modellers found the cannons to be inaccurate and scratch built them themselves. I did drill out the end of the cannons to make them look a little more realistic, but I do that with most models.
I also read that the man who designed the Star Fury was disappointed with the dimensions because the animated StarFury's get compressed when the footage is converted for television. I personally like my fat little StarFury and it has pride of place now. (Well at least until I finish the next project!).


DLP Guitars - Handmade in Birmingham, England

Saturday, November 26, 2005

Babylon 5 - Starfury MK1 - Construction (Part 1)

This page details the steps I took constructing the Starfury MK1 from the Babylon 5 TV. series. I will detail what is involved in the construction over the next few months. The model is made by Revel Monogram and I think it's the first I've made of theirs. I have got a Cylon Raider ship from Batlestar Galactica and Voyager from Star Trek made by the same people, so this project will give me an idea of what to expect. So far I have fitted the two half's and the back of the fuselage together and attached it to the lower wing, then fitted and filled the inner wings then fitted and filled the upper inner wings.

You can see some of the filler on the wing at the bottom of this picture. Next I attached the other part of the wing which completes the thruster pods on the end of each wing. some more filling is required just to tidy these up but not too much because all the thrusters have to be attached yet. I have also started to detail the pilot and cockpit because I plan to prime and paint the model virtually completed so I have also started masking off the cockpit windows which takes ages because it is so tiny. There are four different sets of decals provided with the kit so I have to decide which one to choose pretty soon.


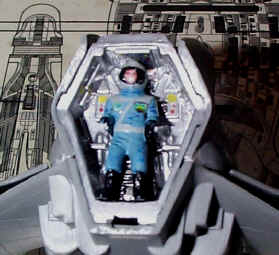
In this picture you can see detail on the pilot. This model has some of the smallest decals I have ever seen, including the badges on the pilot's arms and lapels and the actual helmet face. I am not too fanatical on getting details 100 percent correct although I have every respect for modellers who spend hours watching clips and searching out reference material. I am just looking for realism, I'll make up my own history and story for each model so that is why the colours might not be the same as those on TV. Once I have finished with the cockpit I can attach the two halves together and fit the cockpit canopy so I have got plenty to do.

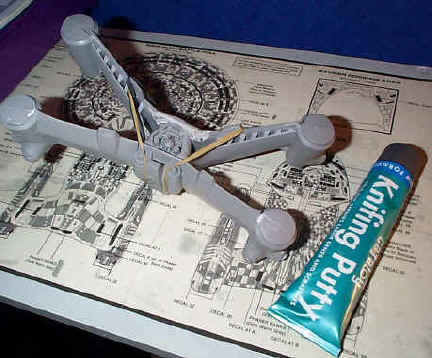
Now I have attached the two half's together. I have got some new filler from Halford's car accessories called Knifing Putty. It seems OK but time will tell as I am now waiting for some to dry where the two parts meet. I think this will give a smother finish than the Humbrol model filler I had been using. The main problem with this was this was it had gone off slightly and it was difficult to get any out of the tube. I suppose this is why a lot of modellers use car filler with a separate hardener.

Now I have finished detailing the cockpit I have attached the glass canopy and filled around the joints. I masked the windows by covering the area with tape and then trimming it with a scalpel. I used to cut little bits of tape and stick them on, but this took hours. The new method saves so much time and effort I can't believe I did not think of it before. I have been tidying up the rest of the parts and I will attach them over the next couple of days. I have now bought some spray paint for the job. I have picked a metallic black spray because I have decided to go for the Black Omega look (as shown on the back of the box).

Nearly ready for the first coat of paint, I have filled the wing joints and rubbed them down an attached the cannons and thrusters. I drilled out the ends of the cannons to give them a more realistic look. Next I have to attach the vanes to the thruster pods then it should be ready for a coat of primer. I have also took the shine of the body with a quick sanding all over, just to give the paint a key to grip to. I have also assembled the base so I can spray that at the same time.

I have just sprayed the completed model with grey car primer. It took a couple of goes to get it all covered and once everything was dry I was able to sand down any thing that stood out and give it one more complete covering. Next will come the Black Pearlescent top coat once everything is thoroughly dry.
We are now coming to the final stages now. I have sprayed the Starfury and stand with the Black Pearlescent car paint and it gives a good metallic finish. I now have to apply the decals and weather the ship now using lighter colours as a pose to the normal blacks and rusts to simulate leakage and scorching. There is a little touching up to be done around the cockpit windows and the whole thing will then need a coat of lacquer to bring all the surfaces together.